


It's summer again, and even though summer vacations are a few years behind me and I have to work like a boring grown up through summer now, I still get that giddy sense of freedom when summer rolls around again. I start to think of all fun stuff you could do as a kid over summer vacation that you just didn't have time for during the school year. Anything to do with crafting was always my favorite. Friendship bracelets, tie-dying, flower crowns, and my all time favorite, Shrinky Dinks. Of course, Shrinky Dinks are not strictly a summer nostalgia craft, you can make them any time of the year (Shrinky Dinks Christmas ornaments anyone?), but in my mind they are irrevocably linked to summer. My jewelry box box used to be filled with all kinds of useless Shrinky Dink charms to put on necklaces and bracelets, so I thought it would be fun to update my childhood obsession with Shrinky Dink jewelry for my blog's first DIY. I'll be showing you how to make a feather wrap around ring. Like the one above.
Instructions after the jump!
First, a gathering of materials you will need:

1. a piece of card board (for putting under the feather as it bakes in the oven)
2. a pair of vinyl gloves
3. clear nail polish
4. a small length of string
5. tin foil finger mold (instructions on how to make this later)
6. shrinkable plastic like Shrinky Dinks (available at craft stores), make sure to get the kind that has a frosted, textured side to it
7. a pencil
8. a sheet of paper for your sketch
Next, you have to do a little math to figure out how large to draw your feather. I figured out mine by wrapping my finger (not to tight) with a the small length of string and then measuring the string. My measurement was about 2.5 inches. The plastic will shrink to about one third its original size, so you will take the measurement of your string and multiply it by three to see how large you need to draw your feather. Since my finger string measured 2.5 inches I want my drawing to be at least 7.5 inches long. However, I want the ends of the ring to overlap, so I rounded up to 8 inches.
Now, sketch what you want your feather to look like on a sheet of paper. (If you're not overly confident in your drawing abilities you can always do an image search online and enlarge the image to fit your measurement and then trace).

I drew mine with graphite drawing pencils because I like the monotone look of it, but you can use all kinds of drawing materials like sharpies or colored pencils.

Now, we're going to take a little pause and make the finger mold. The finger mold is really just a wad of tin foil rolled and smooshed until it's the same size as your finger. I'm sure there's a more scientific way to size your ring, but this works and it's cheap. I slid a favorite store bought ring over my finger mold just to make sure I had it at the right size.
After that, cut the feather out. It looks giant now, but just wait.

To shrink your plastic feather set your oven to 300 degrees (there should also be baking instructions on the packaging that came with the plastic). Then put the feather frosted side (also the side you drew on) up on top of the piece of cardboard and put both of them on a baking sheet. If you don't use the cardboard there's a chance the plastic will stick to your baking sheet and ruin your hard work as well as your baking sheet.

Put the baking sheet in the oven. Now comes the best part! If you have an oven that was made after 1950 (unlike me) it should have a light inside and a little window in the front so you can watch the shrinking happen right before your very eyes. My oven is old (old as balls for the Kate Beaton fans out there) and I had to keep opening it to peek.

Shrinking doesn't take long, so keep an eye on it. As it's shrinking, put your vinyl gloves on and get your finger mold ready. When the plastic has flattened out it's done shrinking.

Here comes the tricky part. Take the baking sheet out of the oven and quickly remove the plastic from the cardboard and wrap it (the un-frosted side should be on the outside) around the finger mold while its still pliable. Remember the plastic is still HOT but it cools quickly. It takes a little finesse to not burn yourself but still get the plastic around the mold before it hardens. If you find yourself with a misshapen piece of hardened plastic, all is not lost! You can put it back into the oven and it will soften up again. However, I wouldn't recommend doing this too many times because it might weaken the plastic a little.

When your plastic, now hopefully in the shape of a ring, is completely cooled after a few minutes, coat the frosted side of the plastic with clear nail polish. The nail polish keeps the pencil (or marker) from rubbing off. Once the nail polish is dry, you can slide your new ring on your finger!
Here's some more photos of how mine turned out:
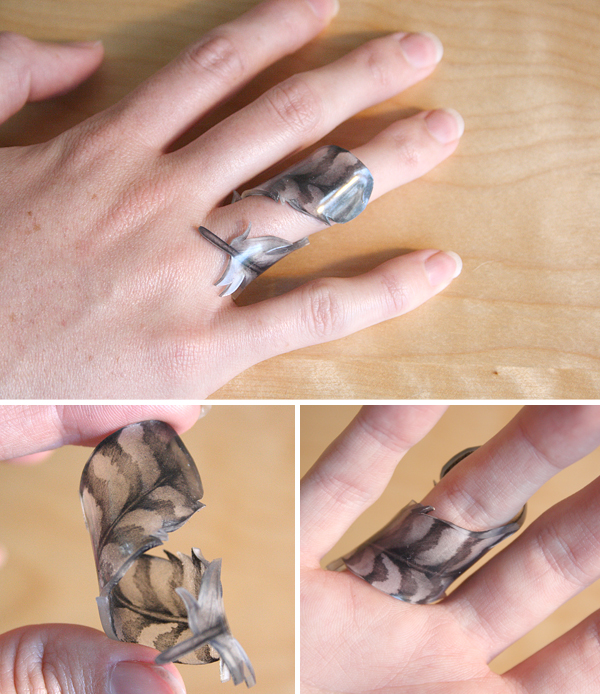
My first one turned out chunkier than I thought it would, so I tried again and made it a little narrower. I like both looks, but I think the second one I made is a little easier to wear (and still have the ability to bend all my fingers).

No comments:
Post a Comment